
Nathan has a new computer. Nathan is happy!
I have had the itch for a faster computer for some time now and when I got my severance check from the old job it seemed like the time. When I priced machines I found that Dell and the other retailers have started pricing computers like used cars. It used to be pretty easy to figure out what various options cost. Now they are making it intentionally difficult to compare apples to apples. So I blew them off and started looking at building my own from components. This is what I ended up with:
| Motherboard | ABIT IS7-E (Intel 865PE) |
| CPU | Pentium 4 2.4C 800Mhz FSB |
| Memory | 2x256mb Corsair XMS 3200 |
| Video | ATI Radeon 9700 Pro |
| Hard Drive | Western Digital Limited Edition 80GB |
| CDRW/DVD Combo | LiteOn 48x24x48x16 |
| Case | Enermax CSX 3171L-B3A |
| Monitor | Daewoo C915DF |
| Speakers | Logitech Z640 5.1 |
 All
the parts started showing up and the boxes started stacking up. This is
going to be fun!.
All
the parts started showing up and the boxes started stacking up. This is
going to be fun!.
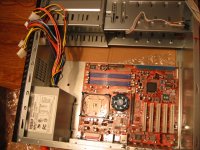
Step One: Install the motherboard in the case. The power supply is nice and small giving easy access to the board. I put in standoffs for every hole on this sucker.
 Step
Two: The CPU and Memory. The retail Pentium 4 comes with a tiny
little chip and a 2-pound heat sink with a fan. I think this guy gets a
little hot. The memory modules are installed just to the right of the
CPU. I also have the hard drive and CD drive installed at this point.
Step
Two: The CPU and Memory. The retail Pentium 4 comes with a tiny
little chip and a 2-pound heat sink with a fan. I think this guy gets a
little hot. The memory modules are installed just to the right of the
CPU. I also have the hard drive and CD drive installed at this point.
 Step
Three: Cooling. The case has a built-in fan plus one in the power
supply but I figure more is better. I had a couple of fans laying around
so tested them to see which was better. The black thing in the top right
is a 12V cordless drill battery for a bench power supply. The fan on the
right was better and had the right connector. Turns out the polarity was
wrong but I popped the pins on the connector and swapped them.
Step
Three: Cooling. The case has a built-in fan plus one in the power
supply but I figure more is better. I had a couple of fans laying around
so tested them to see which was better. The black thing in the top right
is a 12V cordless drill battery for a bench power supply. The fan on the
right was better and had the right connector. Turns out the polarity was
wrong but I popped the pins on the connector and swapped them.
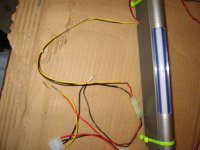 Step
Four: The Light. The case I purchased has a window in the side and
comes with a blue cold-cathode light to make the computer look really
cool. However when the case arrived the light was just bouncing around
inside and had two bare wires coming out the side. So I took apart one of
the drive power leads and soldered a Molex connector to the 12V
pins. The other side of the connector got soldered to the light
leads. I also put wire wraps around the light to keep it from flopping
again.
Step
Four: The Light. The case I purchased has a window in the side and
comes with a blue cold-cathode light to make the computer look really
cool. However when the case arrived the light was just bouncing around
inside and had two bare wires coming out the side. So I took apart one of
the drive power leads and soldered a Molex connector to the 12V
pins. The other side of the connector got soldered to the light
leads. I also put wire wraps around the light to keep it from flopping
again.
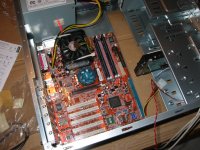
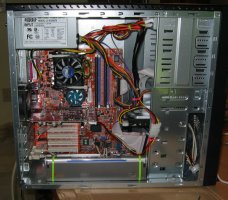
 Step
Five: Video Card and Cables. After snapping the video
card into the AGP slot I ran the cables and installed the floppy drive.
You can see my extra fan installed on the back of the case (to the left).
The little blue fan is a fan ABIT put on the northbridge (high-frequency) part
of the 865PE chipset.
Step
Five: Video Card and Cables. After snapping the video
card into the AGP slot I ran the cables and installed the floppy drive.
You can see my extra fan installed on the back of the case (to the left).
The little blue fan is a fan ABIT put on the northbridge (high-frequency) part
of the 865PE chipset.
Most of the wires are power leads. The mother board has two dedicated power leads, each disk drive gets one, the video card needs one, and the lighting system gets another. The grey wires towards the bottom are two extra USB ports on the back of the case. This sucker has 6 ports on the back and two on the front!
At this point I smoke-tested the system before installing the light and routing the cables. It started right up (whew!).
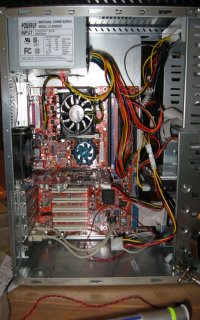
 Here
is what it looked like after I installed the light and got the wires neat (sort
of!). Time to close it up and get the software installed!
Here
is what it looked like after I installed the light and got the wires neat (sort
of!). Time to close it up and get the software installed!
It took the rest of the day to get the BIOS updated, OS installed (XP Pro), and the systems set up.
 The
finished box! This is not for everyone. As it stands I have a killer
machine for around $1600.00 and a day of my time. But I have no support
and only spotty warranty coverage. It is worth it to me for a unique
computer that should keep me happy for years to come. Even my kids think
it is pretty cool.
The
finished box! This is not for everyone. As it stands I have a killer
machine for around $1600.00 and a day of my time. But I have no support
and only spotty warranty coverage. It is worth it to me for a unique
computer that should keep me happy for years to come. Even my kids think
it is pretty cool.
Update (October 2003): Flash is still cooking right along. No problems so far. I did spring for a Sound Blaster Audigy sound card.